

How To Color Background Krita
Introduction to Layers and Masks
Krita supports layers which assist to meliorate control parts and elements of your painting.
Retrieve of an artwork or collage made with various stacks of papers with some papers cut such that they evidence the paper below them while some hibernate what's beneath them. If y'all desire to replace an chemical element in the artwork, you supervene upon that slice of paper instead of drawing the entire thing. In Krita instead of papers we apply Layers. Layers are function of the document which may or may not be transparent, they may be smaller or bigger than the certificate itself, they can arrange i higher up other, named and grouped.
Layers can give better control over your artwork for instance yous tin re-colour an entire artwork just by working on the carve up colour layer and thereby not destroying the line fine art which will reside above this color layer.
Y'all tin can edit individual layers, you can fifty-fifty add special effects to them, similar Layer styles, blending modes, transparency, filters and transforms. Krita takes all these layers in its layer stack, including the special furnishings and combines or composites together a final image. This is just one of the many digital paradigm manipulation tricks that Krita has up its sleeve!
Usually, when you put one paint layer on acme of another, the upper pigment layer will be fully visible, while the layer behind information technology will either be obscured, occluded or simply partially visible.
Managing layers
Some artists draw with limited number of layers, but some prefer to take different elements of the artwork on separate layer. Krita has some good layer management features which brand the layer management chore like shooting fish in a barrel.
You can grouping layers and organize the elements of your artwork.
The layer order can be changed or layers tin be moved in and out of a grouping in the layer stack past simply holding them and dragging and dropping. Layers can also exist copied across documents while in the subwindow mode, by dragging and dropping from 1 document to another.
These features salvage time and also help artists in maintaining the file with a layer stack which will exist easy to understand for others who piece of work on the same file. In addition to these layers and groups tin can both be labeled and filtered by colors, thus helping the artists to visually differentiate them.
To assign a color label to your layer or layer grouping you lot take to  on the layer and cull one of the given colors from the context bill of fare. To remove an already existing color characterization you tin click on the '10' marked box in the context menu.

Once you assign colour labels to your layers, y'all can then filter layers having similar colour label by clicking on ane or more colors in the list from the driblet-down situated in the top-correct corner of the layer docker.

New in version v.0: You lot can also use this dropdown to filter the layers by layer proper name.
Types of Layers

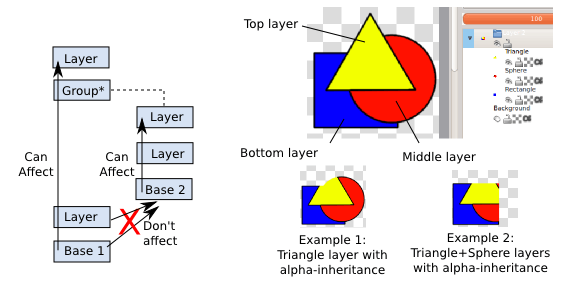
The image above shows the various types of layers in Layers. Each layer type has a different purpose for example all the vector elements can be merely placed on a vector layer and similarly normal raster elements are mostly on the paint layer, Layers and Masks page contains more data about these types layers.
Now Let u.s. come across how these layers are composited in Krita.
How are layers composited in Krita?
In Krita, the visible layers form a composite epitome which is shown on the canvas. The order in which Krita composites the layers is from bottom to top, much similar the stack of papers we discussed above. As we continue adding layers, the epitome we see changes, according to the properties of the newly added layers on top.
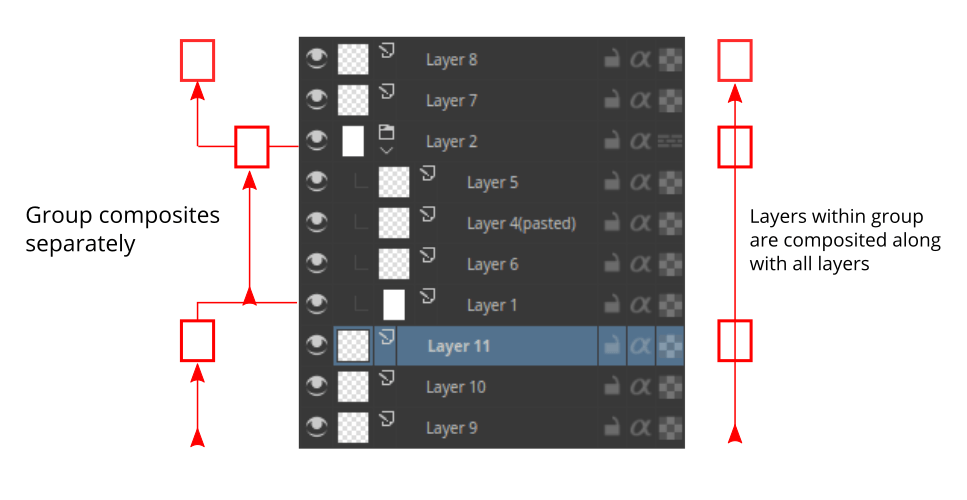
Grouping Layers blended separately from the other layers in the stack, except when pass through mode is activated. The layers inside a grouping course a blended prototype get-go and then this composite is taken into consideration while the layer stack is composited to form a whole prototype. If the pass through manner is activated by pressing the icon similar to bricked wall, the layers within the group are considered as if they are outside that particular group in the layer stack, however, the visibility of the layers in a grouping depends on the visibility of the group.
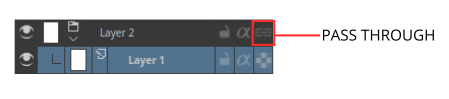
The groups in a PSD file saved from Photoshop have pass-through fashion on past default unless they are specifically set with other blending modes.
Inherit Alpha or Clipping layers
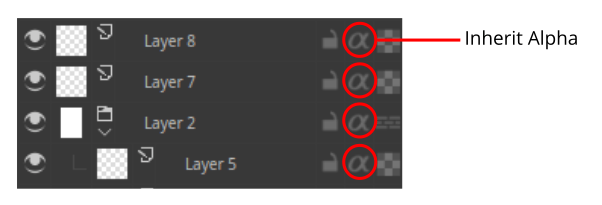
At that place is a clipping feature in Krita called inherit alpha. Information technology is denoted by an alpha icon in the layer stack.
It can be somewhat hard to figure out how the inherit blastoff feature works in Krita for the first time. Once you click on the inherit blastoff icon on the layer stack, the pixels of the layer you are painting on are confined to the combined pixel surface area of all the layers below it. That means if y'all accept the default white background layer as kickoff layer, clicking on the inherit alpha icon and painting on any layer above will seem to have no effect every bit the entire canvas is filled with white. Hence, it is brash to put the base layer that you want the pixels to prune in a grouping layer. As mentioned above, group layers are composited separately, hence the layer which is the lowest layer in a group becomes the bounding layer and the content of the layers above this layer clips to it if inherit alpha is enabled.
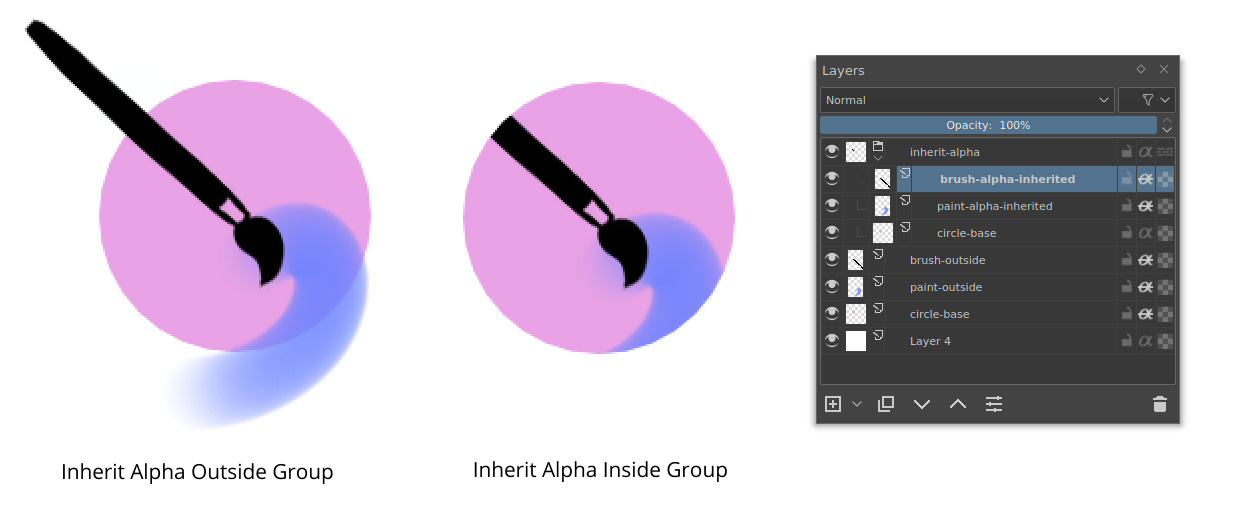
You can also enable alpha inheritance to a grouping layer.
Masks and Filters
Krita supports non-destructive editing of the content of the layer. Not-destructive editing ways editing or changing a layer or epitome without actually irresolute the original source image permanently, the changes are just added as filters or masks over the original epitome while keeping it intact, this helps a lot when your workflow requires constant back and forth. Yous tin go dorsum to original image with a click of a button. But hibernate the filter or mask y'all have your initial prototype.
Yous tin add various filters to a layer with Filter mask, or add Filter layer which volition affect the whole image. Layers can also exist transformed non-destructively with the transformation masks, and even have portions temporarily hidden with a Transparent Mask. Non-destructive furnishings like these are very useful when you modify your heed later, or need to brand a set of variations of a given image.
Note
You can merge all visible layers by selecting everything commencement . So Combine them all by merging .
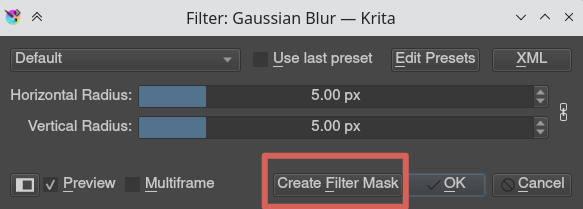
These filters and masks are accessible through the correct-click carte du jour (as shown in the prototype below) and the Plus icon on the layer docker.

Yous can likewise add a filter equally a mask from filter dialog itself, past clicking on the Create Filter Mask push.
All the filters and masks tin as well be applied over a group too, thus making it easy to non-destructively edit multiple layers at in one case. In the category Layers and masks you lot can read more about the individual types of layers and masks.
Layer Docker has more information most the shortcuts and other layer management workflows.

How To Color Background Krita,
Source: https://docs.krita.org/en/user_manual/layers_and_masks.html
Posted by: cadizfluentsmay.blogspot.com
0 Response to "How To Color Background Krita"
Post a Comment